If you’re into radio-controlled (RC) cars, there’s a good chance you’ll want to race them against friends or others at some point. Doing so is relatively simple once you have the proper equipment, which includes an RC car that’s been set up for racing. You’ll also need a wide open space in which to race; most people use parking lots, driveways, or large basements.
- Choose a location to set up the RC car
- It should be a flat, open space where the car can move around freely without hitting anything
- Place the RC car on the ground and turn it on
- Use the controller to guide the car around the area
- Be careful not to hit any obstacles or drive too fast, as this can damage the car or cause it to crash
- When you’re finished driving, turn off the RC car and put it away in a safe place until you’re ready to use it again
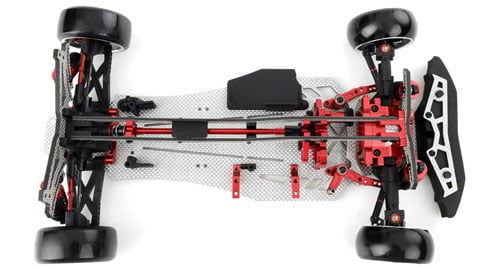
On road RC car setup guide – 1/10 touring
Rc Car Setup Guide
Rc Car Setup Guide
If you’re new to RC cars, the process of setting one up can seem daunting. But don’t worry – we’ve got you covered with this comprehensive guide!
The first thing you’ll need to do is choose a chassis. There are many different types available on the market, so it’s important to select one that suits your driving style and needs. Once you’ve decided on a chassis, it’s time to start building!
Begin by installing the radio receiver and servos. These components are responsible for controlling the car, so it’s important to get them installed correctly. Next up is the motor and ESC (electronic speed control).
These two components work together to power your car and allow you to control its speed.
After the motor and ESC are in place, it’s time to install the batteries. Depending on the type of RC car you have, you’ll either need AA or AAA batteries.
Once the batteries are installed, you can move on to attaching the wheels and tires. Again, there are many different options available so be sure to choose ones that suit your driving style and needs.
Finally, it’s time for a test drive!
Take your RC car out for a spin around your neighborhood or local park to see how it handles. If everything feels good, then congratulations – you’ve successfully set up your very own RC car!
Rc Car Setup Station
If you’re into RC cars, then you know that having a good setup station is important. Here’s a detailed look at what a setup station is and why you need one.
A setup station is basically a workbench for your RC car.
It provides a place to put your car while you’re working on it, and it has all the tools and supplies you need to tune up your ride. It’s also a great place to keep your spare parts organized.
Why do you need a setup station?
First, it makes working on your car much easier. You don’t have to worry about holding the car while you’re trying to adjust something – everything is right there at arm’s reach. Second, it keeps your work area tidy and organized so you can focus on what you’re doing.
And third, it helps prevent damage to your car by keeping it off the floor (where it could get stepped on or crushed).
So if you’re serious about RC cars, make sure you have a good setup station. It’ll make life much easier – trust us!
Rc Car Suspension Setup
It is important to have a well-tuned RC car suspension for optimal performance. Here are some tips on setting up your RC car suspension:
1. Start by adjusting the pre-load on the springs.
This will determine how much force is required to compress the spring. A higher pre-load will result in a stiffer suspension, while a lower pre-load will make the suspension softer.
2. Next, adjust the dampening on the shocks.
This controls how quickly the shocks rebound after being compressed. A higher dampening rate will make the shocks rebound slower, while a lower dampening rate will make them rebound faster.
3. Finally, adjust the camber and toe settings on your wheels.
These settings affect how much grip your tires have and how straight your car drives down the road. Incorrectly adjusted camber and toe can cause your tires to wear out prematurely or cause your car to pull to one side while driving.
Rc Car Setup App
If you’re into RC cars, then you know that having the right setup is crucial to getting the most out of your car. But finding the perfect setup can be a tough and time-consuming process. That’s where the RC Car Setup App comes in.
This app is designed to help you find the optimal setup for your RC car, based on track conditions, driving style, and other factors. All you need to do is enter some basic information about your car and the app will do the rest. It’ll even generate a custom set-up sheet that you can take with you to the track.
Whether you’re a beginner or a seasoned pro, the RC Car Setup App is a valuable tool that can help you get the most out of your car. So if you’re looking to take your RC car racing to the next level, be sure to check out this app.
Rc Car Steering Setup
There are a few things to consider when setting up the steering on your RC car. Ultimately, you want to achieve a balance between responsiveness and stability. Too much of either can make the car difficult to control.
Here are a few things to keep in mind during the setup process:
1. Servo saver: The servo saver is responsible for protecting the servo from damage in case of a crash. It’s important to adjust the tension on the servo saver so that it’s not too loose or too tight.
If it’s too loose, the servo could be damaged in a crash. If it’s too tight, it will make the steering less responsive.
2. Ackermann angle: This is the angle between the inner and outer wheels when turning.
A properly adjusted Ackermann angle will result in more precise turns and improved handling overall.
3. Toe-in/toe-out: Toe-in refers to when the front wheels are pointing slightly inward toward each other. This helps with stability at high speeds because it reduces toe drag (the tendency of the wheels to point outward).
Too much toe-in can make the car difficult to turn, however, so it’s important to find a balance.
How to Set Camber on Rc Car
Most RC car enthusiasts will tell you that camber is one of the most important aspects of setting up your car. Camber is the angle of the tires in relation to the ground when viewed from the front or rear of the car. If your tires are angled outward, then you have positive camber.
If they’re angled inward, then you have negative camber.
The ideal camber setting will vary depending on the track conditions and your driving style, but generally speaking, you want as much contact patch with the ground as possible. This gives you more traction and helps your car maintain grip through corners.
There are a few different ways to adjust camber on an RC car. The easiest way is to use adjustable suspension arms or hubs. Most kits come with these parts already installed, so all you need to do is loosen a few screws, rotate the arms or hubs to the desired position, and then tighten everything back down again.
If your kit doesn’t include adjustable suspension parts, then you’ll need to shim your axles. This involves adding thin washers between the axle and wheel hub in order to change the angle of the wheel assembly. It’s a bit more time-consuming than using adjustable parts, but it’s still relatively easy to do once you get the hang of it.
Whether you’re using adjustable parts or shims, always make sure that both sides of the car are set up identically! Even a small difference in camber can drastically affect handling and performance.
Hudy 1/10 Offroad Setup Guide
If you’re new to the world of 1/10 offroad RC racing, then you’ve come to the right place! In this blog post, we’ll be taking a detailed look at the Hudy 1/10 Offroad Setup Guide. This guide is packed full of information that will help you get your car dialed in and ready to hit the track.
We’ll cover everything from choosing the right tires to setting up your suspension, so let’s get started!
One of the most important things to consider when setting up your 1/10 offroad RC car is tire selection. There are many different types and brands of tires available, so it’s important to do some research and figure out which ones will work best for your particular driving style and local track conditions.
Once you’ve chosen the right tires, it’s time to start thinking about suspension setup.
There are numerous factors that go into setting up your suspension, but perhaps the most important one is ride height. This is typically measured from the ground to the center of the chassis, and it’s critical that you get it set correctly in order to avoid bottoming out on jumps or bumps.
Other important aspects of suspension setup include camber angle (the angle at which your tire meets the ground), toe-in/toe-out (how much your tires turn inward or outward when viewed from above), and shock rebound damping (how quickly your shocks return to their original position after being compressed).
Once you have all of these factors sorted out, it’s time to start testing! Take your car out for some practice laps and make note of how it feels.
Is it stable through corners? Does it feel too loose or too tight? Adjustments can be made as needed until you find a setup that works well for you.
And that’s all there is to it! With a little bit of time and effort, you can have your 1/10 offroad RC car dialed in and ready for action.
Rc Setup Software
There are many different RC setup software programs available on the market today. They all have their own unique features and benefits. So, which one is the best for you?
It really depends on your individual needs and preferences.
One popular program is called RC Setuplab. It offers a wide range of features, including an intuitive interface, support for multiple languages, and the ability to create custom setups for your specific needs.
Another great option is Airdata UAV, which provides detailed information about your flights, including GPS tracking and live telemetry data.
Whatever program you choose, make sure it has the features you need to get the most out of your RC flying experience!
Credit: blog.rcmart.com
How Do You Connect an Rc Car?
Assuming you would like a blog post discussing how to connect an RC car:
“How to Connect an RC Car”
Whether you are new to RC cars or just need a refresher, it is important to know how to properly connect your car.
This guide will walk you through the process of connecting an RC car.
The first thing you need to do is gather the necessary supplies. You will need the RC car, a controller, and batteries for both the car and controller.
Once you have all of your supplies, it’s time to get started!
To begin, locate the battery compartment on the RC car. Open up the compartment and insert the batteries according to their polarity (positive and negative).
Once the batteries are inserted, close up the battery compartment and make sure it is secure.
Next, take the controller and open up its battery compartment. Again, insert the batteries paying attention to their polarity.
Close up the battery compartment when finished.
Now it’s time to connect the controller to the RC car. There should be a port on both the controller and car that they can plug into each other.
If there is no port, then look for two metal contact points that can touch each other in order for electricity to flow between them. Make sure that once they are connected, they are snug and secure so that they don’t come disconnected while in use.
And that’s it!
Your RC car should now be connected and ready for use. Be sure to read any additional instructions that came with your specific model before using it as every model may be slightly different.
What Do You Need for a Rc Car?
Building your own remote control (RC) car is a rewarding and educational hobby. Not only do you get to indulge in a creative and challenging activity, but you also end up with a fantastic toy that you can play with for hours on end. Plus, if you have kids, they’ll be sure to love it too!
There are a few things you’ll need before you can start building your RC car. First, of course, is the car itself. You’ll need to choose a model that suits your budget and skill level.
If you’re new to the hobby, it’s probably best to start with something simple and inexpensive. Once you’ve got the hang of things, you can move onto more complicated models.
Next, you’ll need some tools.
A screwdriver set, wire cutters/strippers and soldering iron will come in handy. You might also want to invest in a good set of pliers and an X-Acto knife. Of course, if you’re going to be doing any painting or customizing, then additional supplies will be required (paintbrushes, etc.).
The electronics are perhaps the most important part of your RC car. At a minimum, you’ll need a motor (or two), batteries, speed control unit and receiver. The type of batteries you use will depend on the motor – brushed or brushless?
– so make sure to get the right ones! For the transmitter (the controller), there are many different types available on the market; which one is best for you depends on personal preference as well as budget. Generally speaking though, 2-channel controllers are fine for beginners while more advanced users may prefer 3- or 4-channel units.
Last but not least are the tires & wheels. Again, there’s quite a lot of choice out there so it really depends on what kind of look/performance you’re going for with your car as to which ones are best suited. Likewise with the body shell – this is very much down to personal taste! There are literally thousands of different shells available from numerous manufacturers; Lexan shells tend to be popular for racing cars while polycarbonate shells offer more strength & durability (and thus are often used for bashing around!). As long as it fits on your chassis properly though, anything goes!
How Do You Sync an Rc Controller?
Assuming you would like a blog post discussing how to synchronize an RC controller:
“How to Sync an RC Controller”
In order to sync an RC controller, you’ll need to connect the controller to the receiver.
Once they are connected, you will need to bind the receiver to the controller. This process can vary depending on your specific model of controller and receiver, so be sure to consult your manual for specific instructions. After the binding process is complete, your RC controller should be synced and ready to use!
How Do You Set Up a Rc Buggy?
If you’re thinking about getting into the exciting world of RC buggies, you’re probably wondering how to set one up. It’s actually not as difficult as you might think, and with a little bit of know-how, you can be up and running in no time. Here’s everything you need to know about setting up a RC buggy.
The first thing you’ll need to do is assemble the buggy itself. If you’re buying a kit, this will usually involve putting together the chassis, body and suspension components. This can be a fun process in itself, and it’s always satisfying to see your creation come together piece by piece.
Once the buggy is assembled, it’s time to install the electronics.
This will include things like the motor, speed controller, radio receiver and servos (if your buggy has them). Again, if you’re using a kit, these should all be included and relatively easy to install.
If not, there are plenty of online tutorials that can help walk you through the process step by step. Once everything is installed and wired up correctly, it’s time for a test run!
Find a safe place to test drive your new buggy – an empty parking lot or quiet country road would be ideal.
Start slowly at first to get a feel for how the buggy handles before opening it up and letting it rip! With a little practice (and maybe some tuning), you’ll soon be tearing up the trails with your very own RC buggy.
Conclusion
If you’re a fan of remote control (RC) cars, you may be wondering how to set one up. It’s actually not as difficult as it may seem. In this article, we’ll walk you through the process step by step so that you can get your RC car up and running in no time.
The first thing you’ll need to do is charge the battery for your RC car. Once the battery is charged, you can then connect it to the car. Next, you’ll need to add fuel to the car.
You can either use regular gasoline or nitro fuel, depending on what kind of RC car you have.
Once the fuel is added, you’ll need to turn on the transmitter for your RC car. Then, simply press the throttle and your RC car will start moving!